Paul Hedrick (talk | contribs) No edit summary |
Tom Sponheim (talk | contribs) mNo edit summary |
||
| Line 1: | Line 1: | ||
| − | [[Image:Sunny_Cooker_-_LSA_1.jpg| |
+ | [[Image:Sunny_Cooker_-_LSA_1.jpg|300px|none]] |
| − | [[File:Sunny_Cooker_string_attachment.jpg|thumb| |
+ | [[File:Sunny_Cooker_string_attachment.jpg|thumb|none|300px|A string is added across the base panels to help maintain shape.]] |
| − | The price of corrugated cardboard, which is widely used for the making of low cost solar cookers, has been rising at an annual rate of 15-20% in recent years. |
+ | The price of corrugated cardboard, which is widely used for the making of low cost solar cookers, has been rising at an annual rate of 15-20% in recent years. The price rise is due to the costlier energy, labor, chemical products and recovered paper, which are used for making corrugated cardboard. |
| − | |||
The cardboard price increase may not have an impact on those solar cookers made from used cardboard boxes, but it would impact those made from newly purchased cardboard material. |
The cardboard price increase may not have an impact on those solar cookers made from used cardboard boxes, but it would impact those made from newly purchased cardboard material. |
||
| Line 9: | Line 8: | ||
In early 2008, [[Teong Tan]] set a goal to create a functional solar cooker, from a flat sheet of cardboard, by using 25% less material than that required for a [[CooKit]] solar cooker. The end result, after about eight month's time, is the [[Sunny Cooker]]. |
In early 2008, [[Teong Tan]] set a goal to create a functional solar cooker, from a flat sheet of cardboard, by using 25% less material than that required for a [[CooKit]] solar cooker. The end result, after about eight month's time, is the [[Sunny Cooker]]. |
||
| − | The Sunny Cooker, made from a 36" x 36" sheet of cardboard, has multiple triangular shape reflector panels to help focus sunlight towards a cooking pot. It is designed in such a way that its contour can be easily re-shaped, simply by tilting the cooker forward or backward. |
+ | The Sunny Cooker, made from a 36" x 36" sheet of cardboard, has multiple triangular shape reflector panels to help focus sunlight towards a cooking pot. It is designed in such a way that its contour can be easily re-shaped, simply by tilting the cooker forward or backward. Altering the contour of the cooker would enable the cooker to become more efficient in capturing the sunlight at different sun angles. |
==Material and construction steps== |
==Material and construction steps== |
||
| − | To construct a Sunny Cooker, this will require a square sheet of corrugated cardboard measuring 36”x36”, aluminum foil and glue. |
+ | To construct a Sunny Cooker, this will require a square sheet of corrugated cardboard measuring 36”x36”, aluminum foil and glue. |
| ⚫ | |||
| − | |||
| ⚫ | |||
#Glue the aluminum foil on one side of the square cardboard. |
#Glue the aluminum foil on one side of the square cardboard. |
||
| − | #Draw cooker’s outlines and fold lines on the aluminum side of the cardboard. |
+ | #Draw cooker’s outlines and fold lines on the aluminum side of the cardboard. Make sure that the cardboard corrugations or flutes run vertically from the top to the bottom. |
#Cut away all unwanted parts. |
#Cut away all unwanted parts. |
||
#Crease and fold along the fold lines. |
#Crease and fold along the fold lines. |
||
#Cut open the four slots, and widen them to about the same dimension as the thickness of the cardboard. |
#Cut open the four slots, and widen them to about the same dimension as the thickness of the cardboard. |
||
| − | <br> |
+ | <br /> |
[[Image:Sunny_Cooker_Construction_Plan.jpg|none|600px]] |
[[Image:Sunny_Cooker_Construction_Plan.jpg|none|600px]] |
||
==Cooker assembly and setting cooker== |
==Cooker assembly and setting cooker== |
||
[[Image:Sunny_Cooker_-_Tab_Locking_Steps.jpg|300px|left]] |
[[Image:Sunny_Cooker_-_Tab_Locking_Steps.jpg|300px|left]] |
||
| − | For a new cooker, crush the corrugations or flutes within the two locking tabs first before using it. |
+ | For a new cooker, crush the corrugations or flutes within the two locking tabs first before using it. This will make it easierto bend and insert the locking tabs through the slots. |
| ⚫ | |||
| − | |||
| − | When the sun’s angle is |
+ | When the sun’s angle is above 50°, assemble the cooker by inserting the two locking tabs through the two lower slots. |
| − | |||
| ⚫ | |||
| − | |||
[[Image:Sunny_Cooker_-_Tilting_Steps.jpg|300px|right]] |
[[Image:Sunny_Cooker_-_Tilting_Steps.jpg|300px|right]] |
||
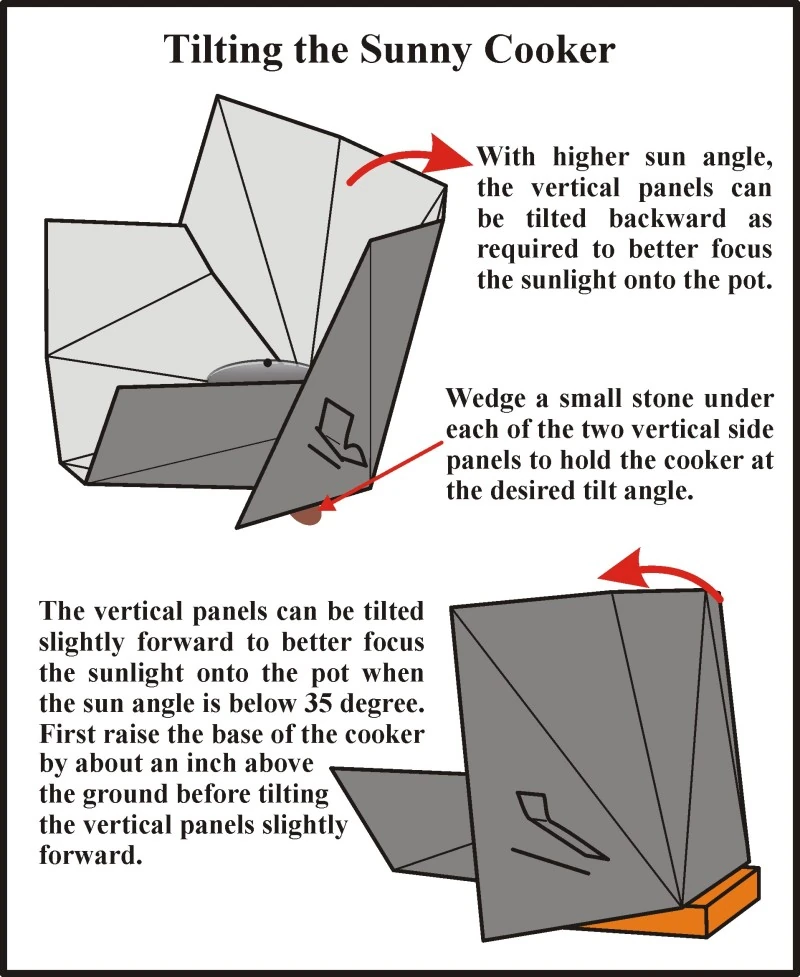
| − | The vertical section of the cooker's panels can be tilted backward, and kept in the desired position, by wedging a small stone under the lower edge of |
+ | The vertical section of the cooker's panels can be tilted backward, and kept in the desired position, by wedging a small stone under the lower edge of the two vertical panels on the side. Backward tilting of the cooker will allow for better focusing of the sunlight towards the cooking pot when the sun moves to a higher altitude. |
==Settings and cooking== |
==Settings and cooking== |
||
| − | To cook, put food in a black metal pot (3 to 4 liters size), and cover the pot with a clear glass lid. |
+ | To cook, put food in a black metal pot (3 to 4 liters size), and cover the pot with a clear glass lid. Enclose the pot inside a clear oven bag, if available, and place the cooking pot on top of the cooker’s base. Set the cooker according to the instructions in the two previous paragraphs, and face the cooker directly towards the Sun to start cooking. Adjust the cooker, from time to time, to ensure that the sunlight stays focused on the cooking pot. |
| ⚫ | |||
| − | |||
| ⚫ | |||
==Storage and Transportation== |
==Storage and Transportation== |
||
[[Image:Sunny_Cooker_-_Storage_Folding_Steps.jpg|350px|right]] |
[[Image:Sunny_Cooker_-_Storage_Folding_Steps.jpg|350px|right]] |
||
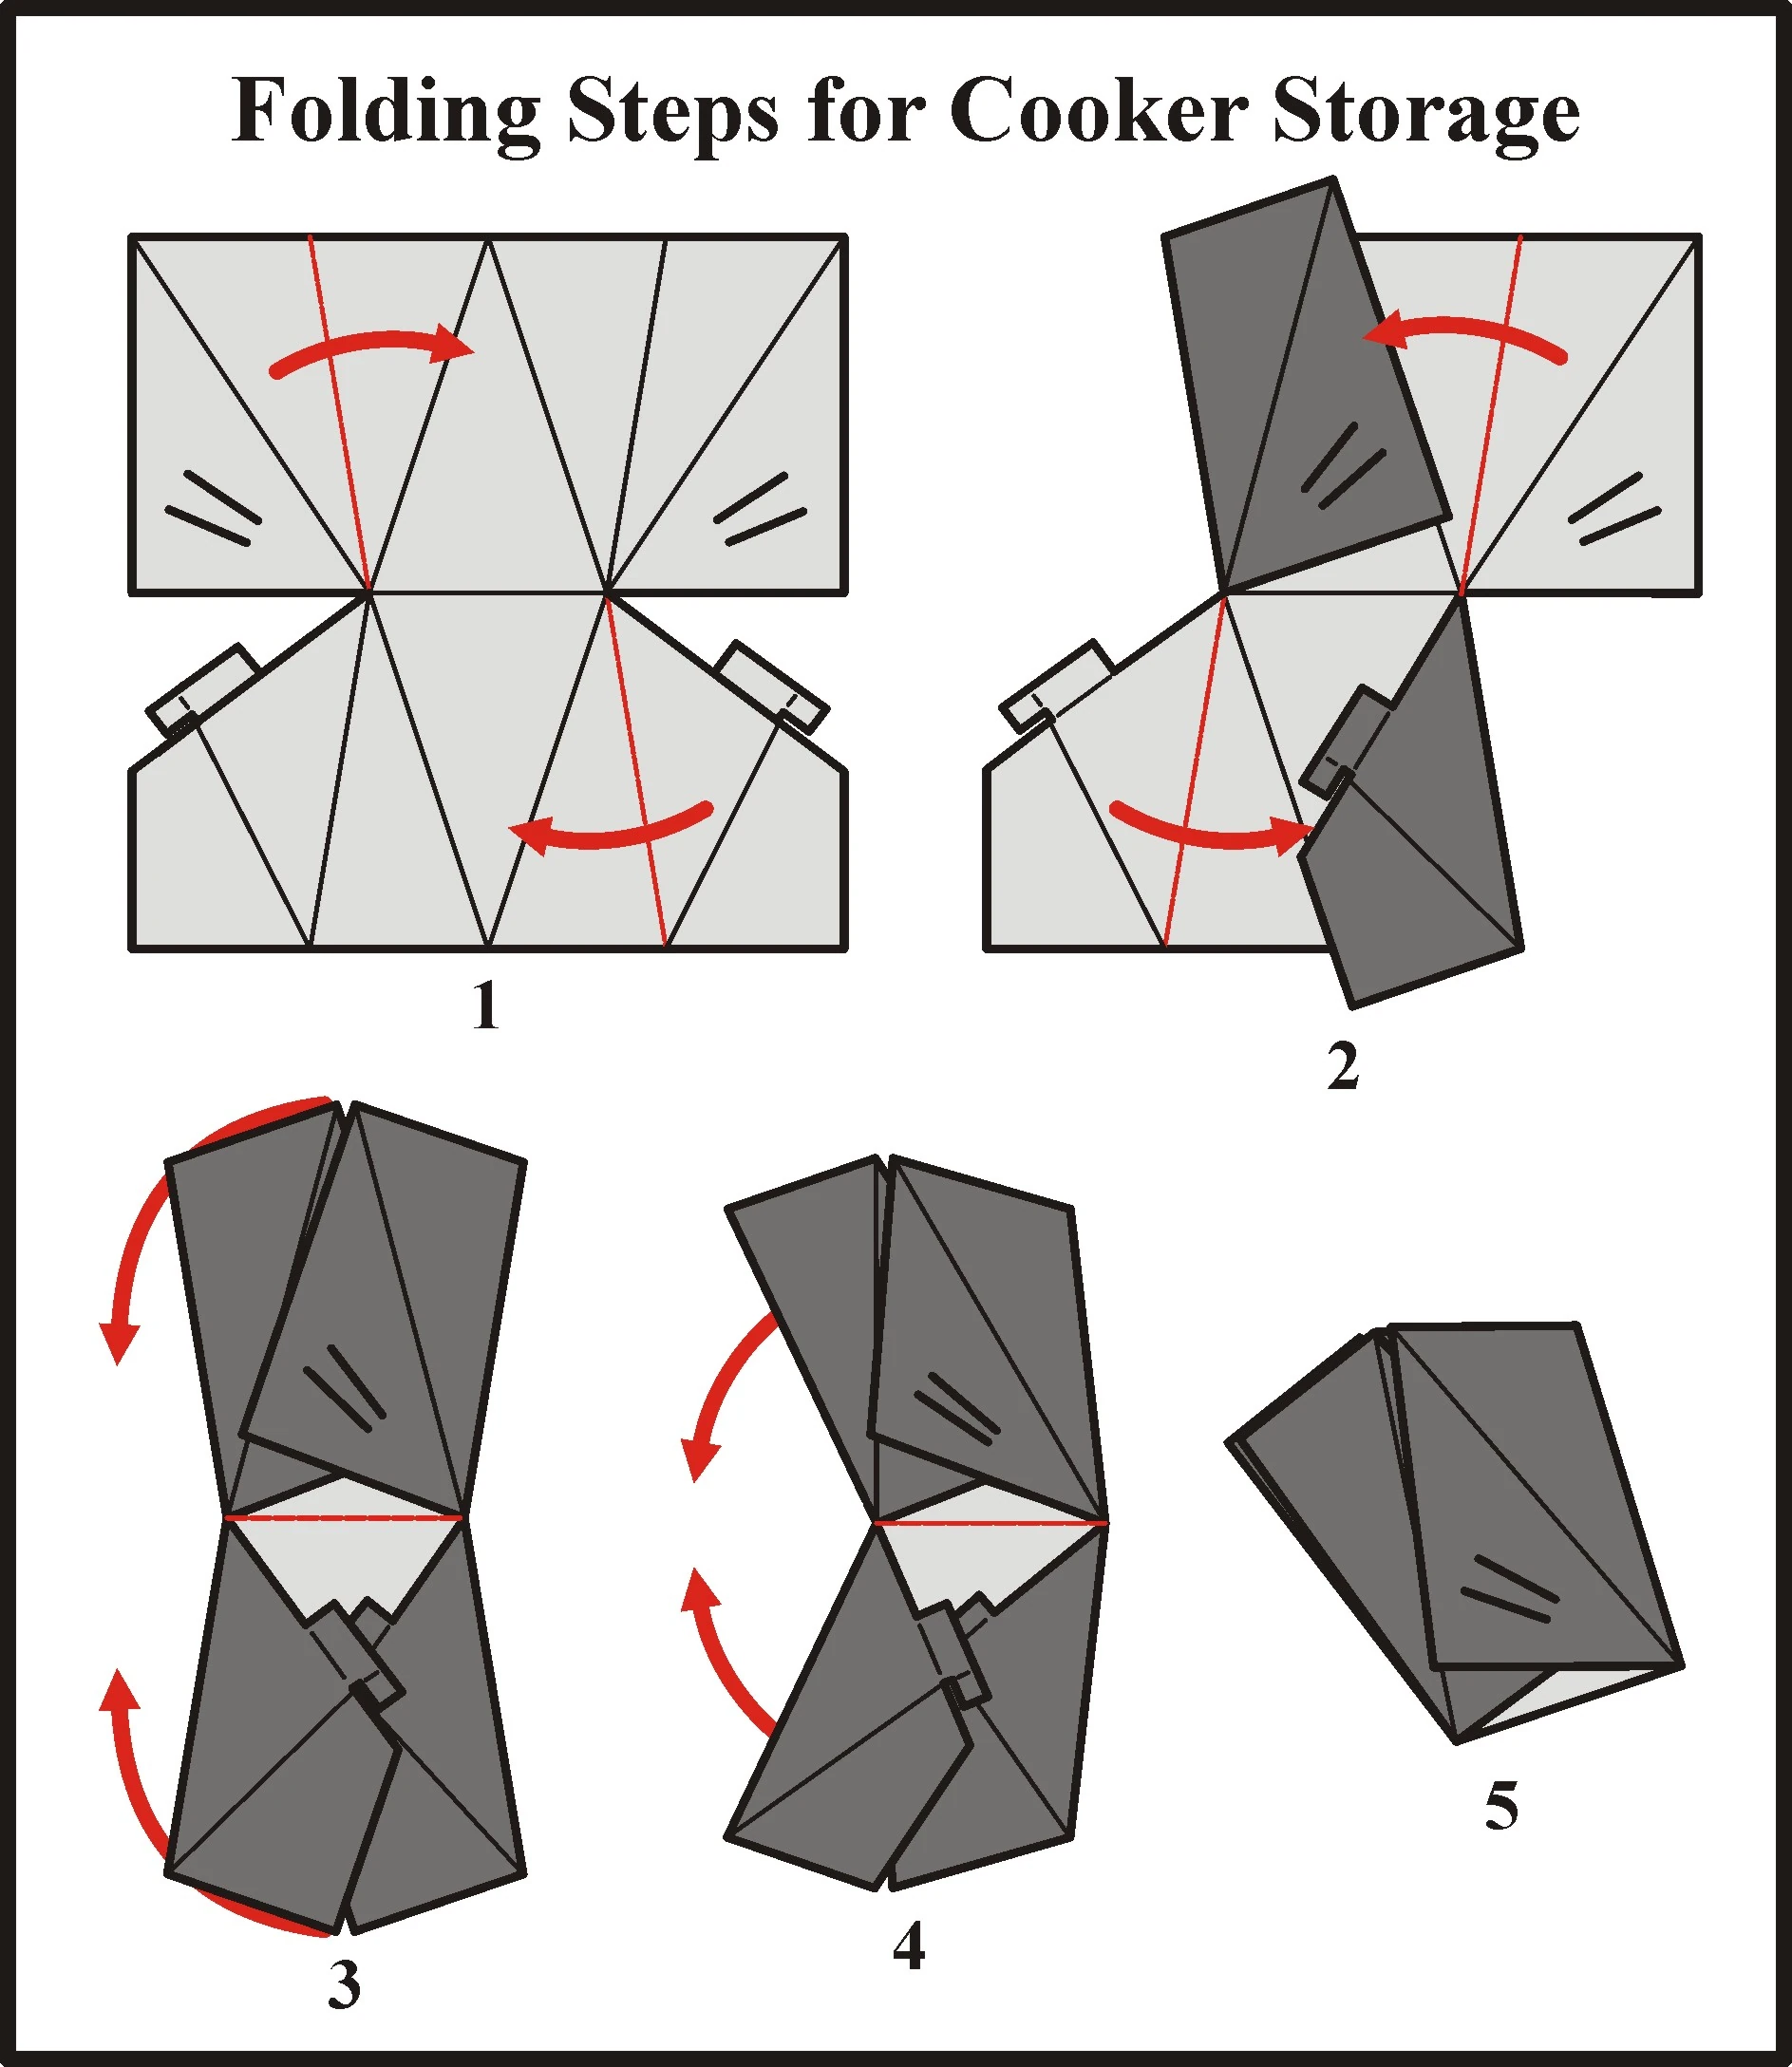
| − | The Sunny Cooker can be fully folded by first releasing the two locking tabs from their slots, and following the folding steps shown in the illustrations below. |
+ | The Sunny Cooker can be fully folded by first releasing the two locking tabs from their slots, and following the folding steps shown in the illustrations below. A fully folded Sunny Cooker measures about 21”x18”x3”. |
| − | |||
Some of the joints, between panels, may remain flat when a folded cooker is taken out of storage and re-assembled for use. To correct this, it is necessary to refold the cooker, along its existing fold lines, and adjust the panels until you get an even cooker curvature. |
Some of the joints, between panels, may remain flat when a folded cooker is taken out of storage and re-assembled for use. To correct this, it is necessary to refold the cooker, along its existing fold lines, and adjust the panels until you get an even cooker curvature. |
||
| − | |||
I hope that the introduction of the Sunny Cooker design will be able to help bring about meaningful savings due to a reduction in the amount of construction material required. |
I hope that the introduction of the Sunny Cooker design will be able to help bring about meaningful savings due to a reduction in the amount of construction material required. |
||
Revision as of 18:20, 9 April 2012
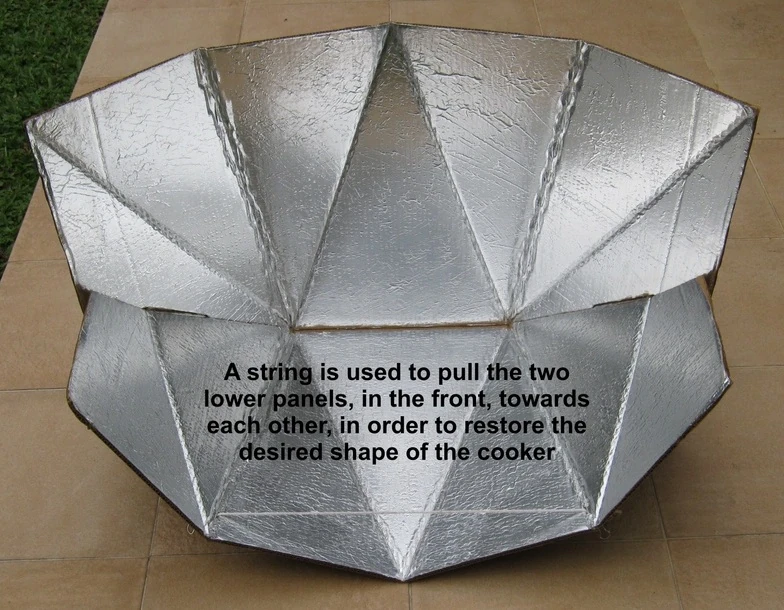
A string is added across the base panels to help maintain shape.
The price of corrugated cardboard, which is widely used for the making of low cost solar cookers, has been rising at an annual rate of 15-20% in recent years. The price rise is due to the costlier energy, labor, chemical products and recovered paper, which are used for making corrugated cardboard. The cardboard price increase may not have an impact on those solar cookers made from used cardboard boxes, but it would impact those made from newly purchased cardboard material.
Cardboard price increase is inevitable, but we could alleviate the cost impact per solar cooker if we are able to reduce the amount of construction material needed in making each solar cooker.
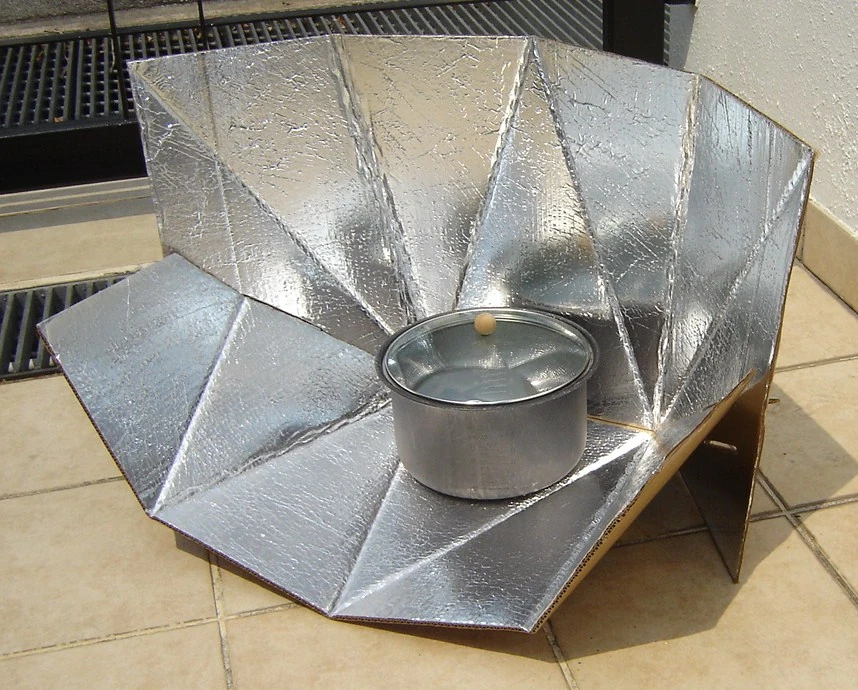
In early 2008, Teong Tan set a goal to create a functional solar cooker, from a flat sheet of cardboard, by using 25% less material than that required for a CooKit solar cooker. The end result, after about eight month's time, is the Sunny Cooker.
The Sunny Cooker, made from a 36" x 36" sheet of cardboard, has multiple triangular shape reflector panels to help focus sunlight towards a cooking pot. It is designed in such a way that its contour can be easily re-shaped, simply by tilting the cooker forward or backward. Altering the contour of the cooker would enable the cooker to become more efficient in capturing the sunlight at different sun angles.
Material and construction steps
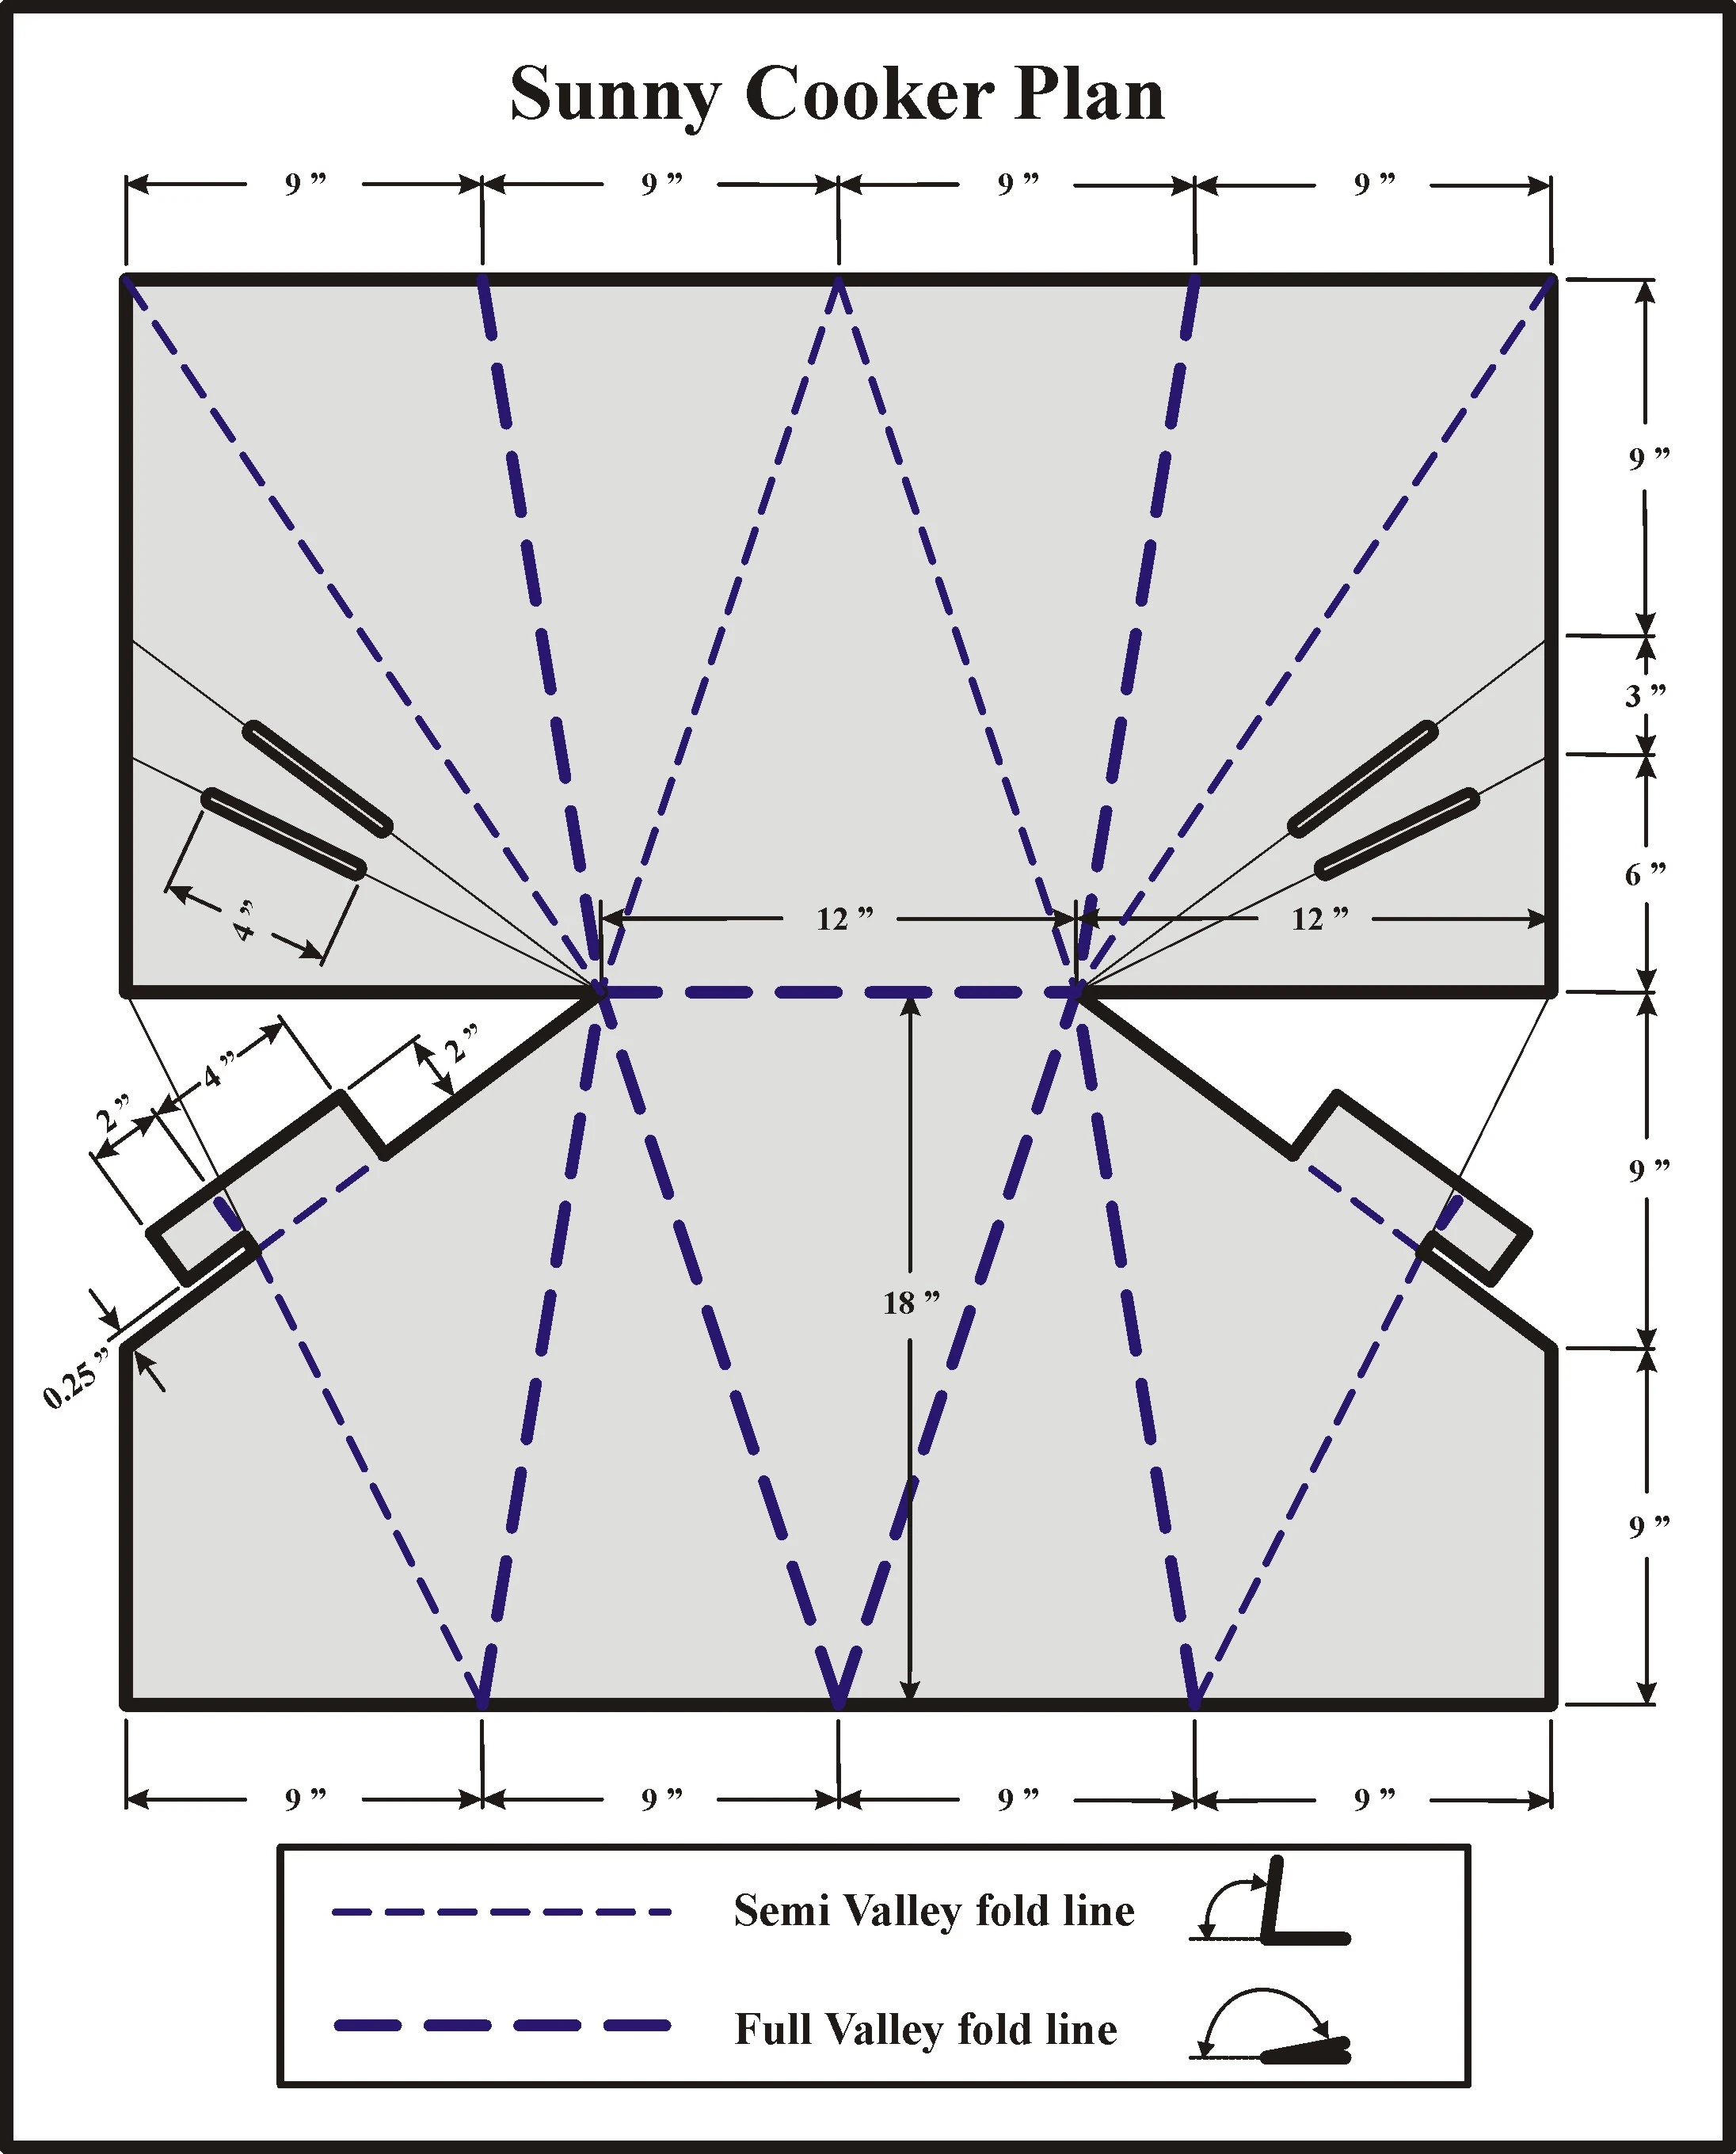
To construct a Sunny Cooker, this will require a square sheet of corrugated cardboard measuring 36”x36”, aluminum foil and glue. The following are the construction steps for the Sunny Cooker:
- Glue the aluminum foil on one side of the square cardboard.
- Draw cooker’s outlines and fold lines on the aluminum side of the cardboard. Make sure that the cardboard corrugations or flutes run vertically from the top to the bottom.
- Cut away all unwanted parts.
- Crease and fold along the fold lines.
- Cut open the four slots, and widen them to about the same dimension as the thickness of the cardboard.
Cooker assembly and setting cooker
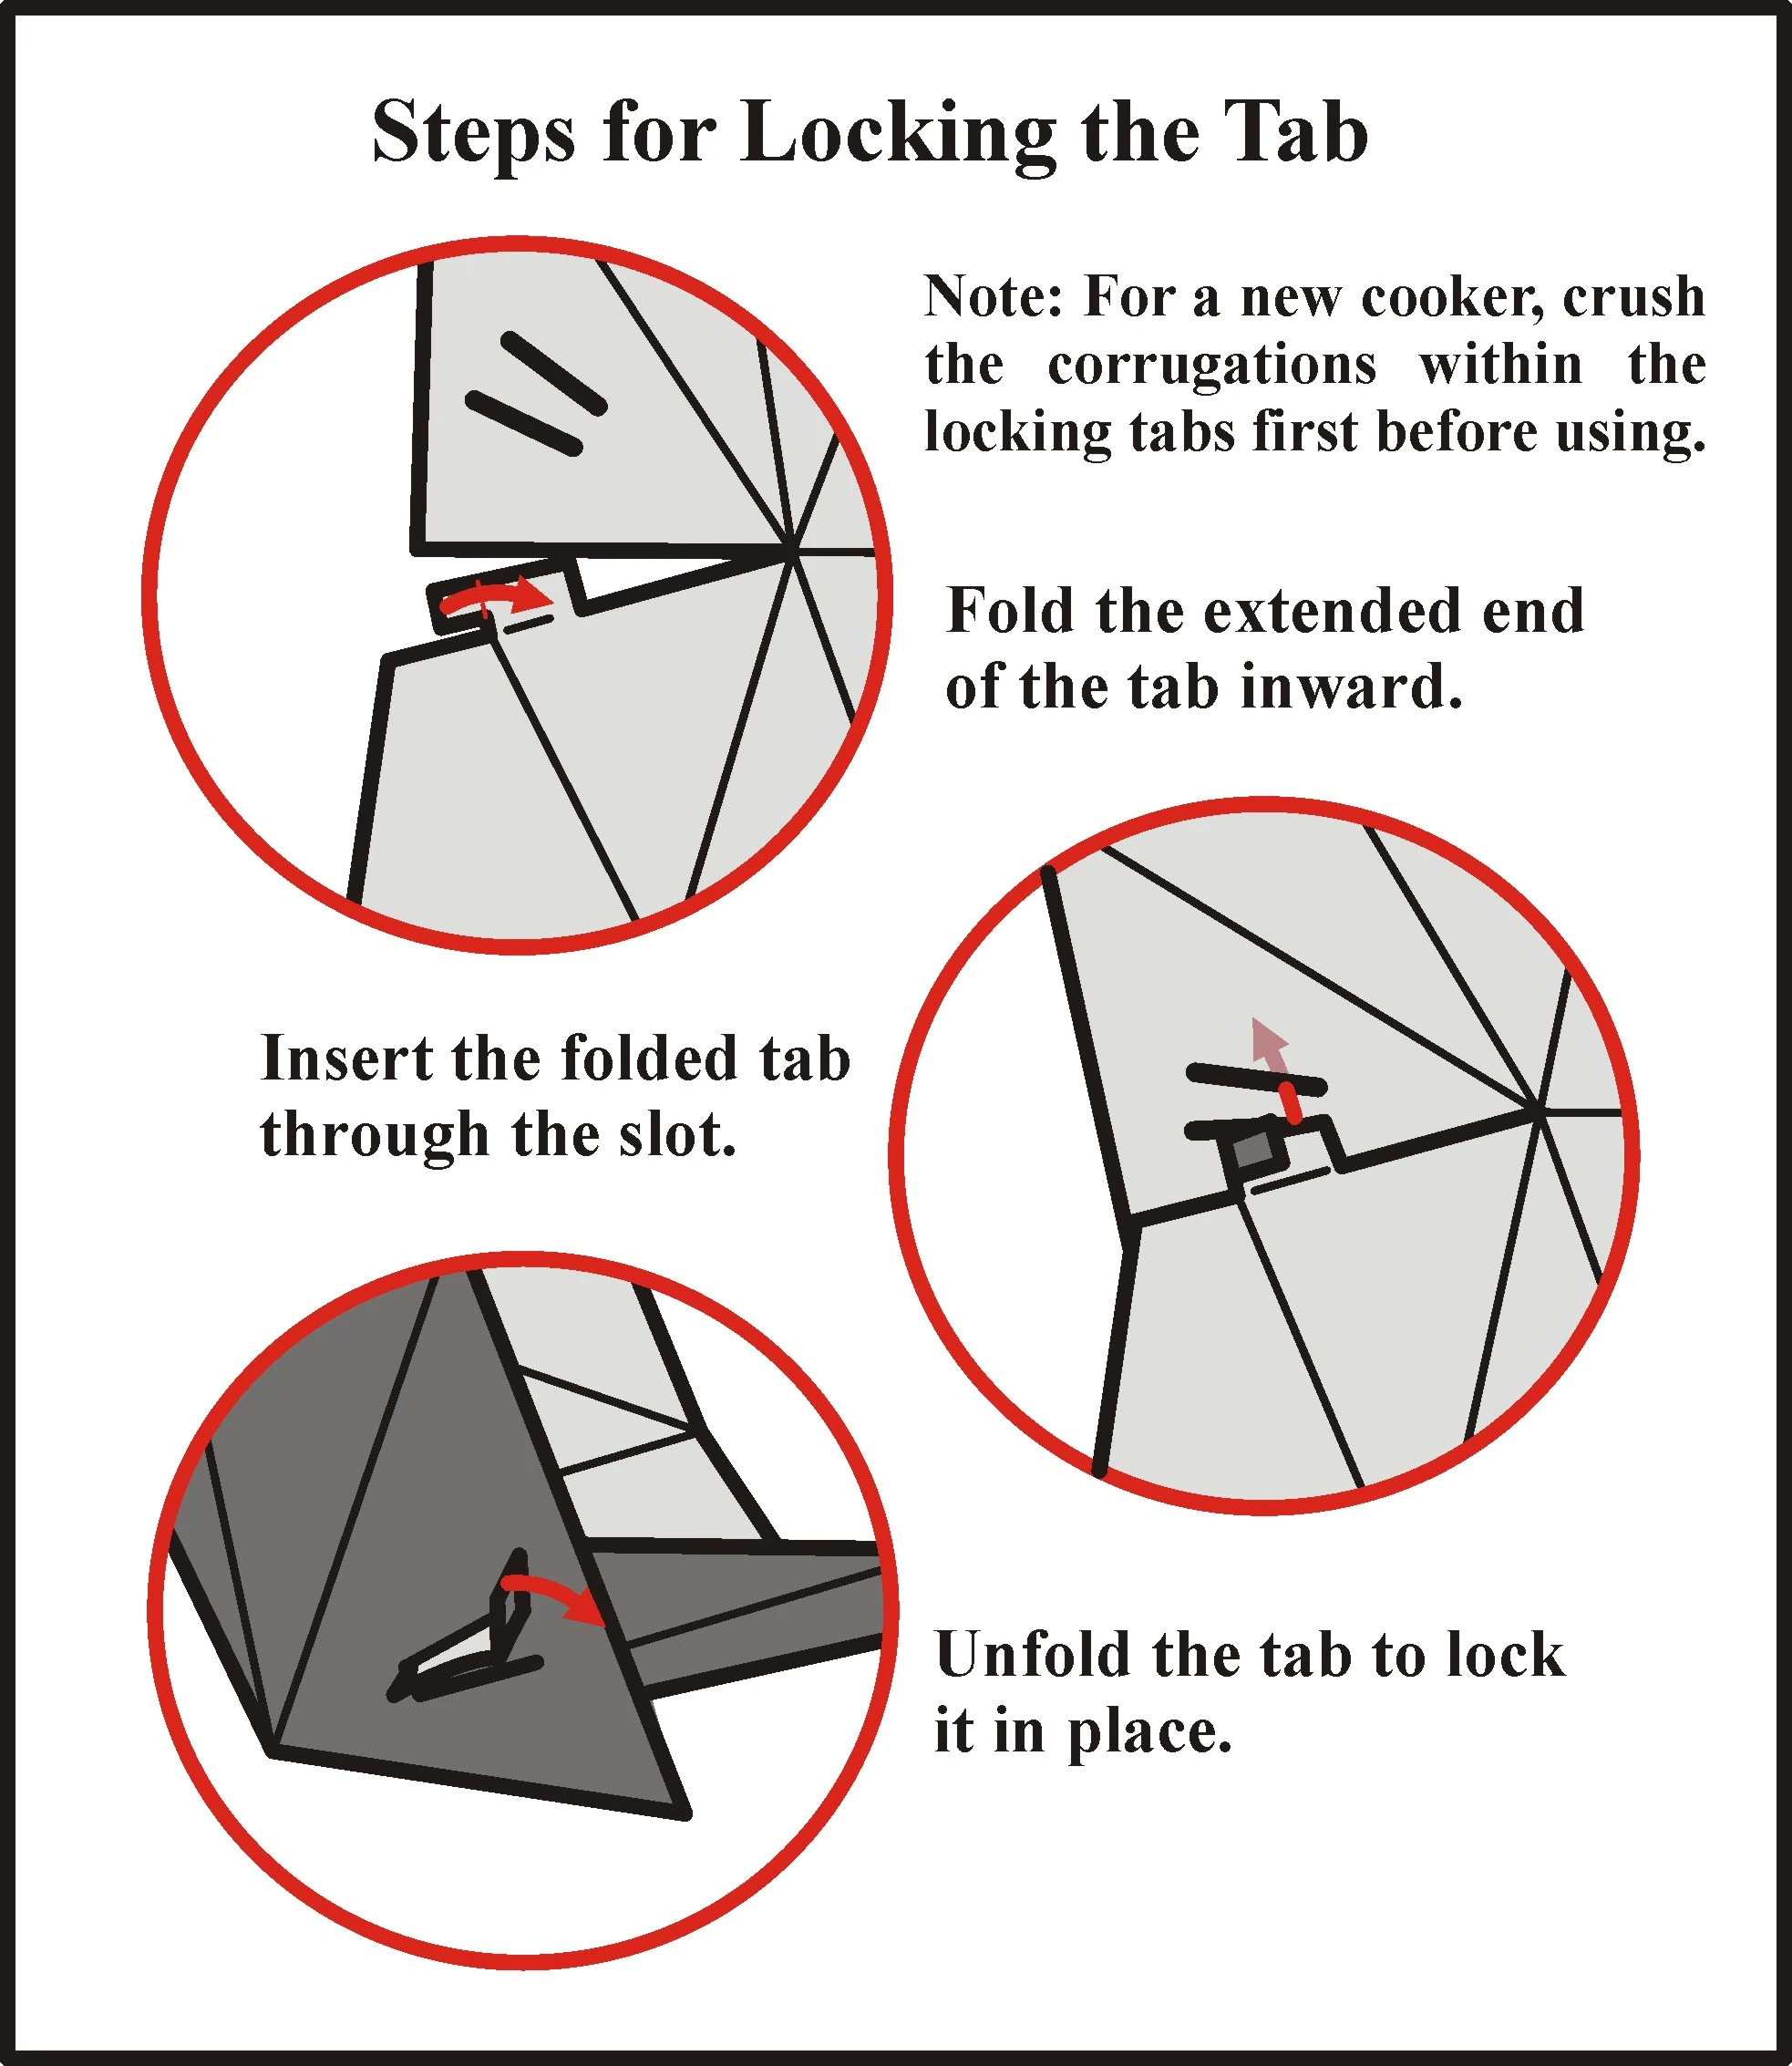
For a new cooker, crush the corrugations or flutes within the two locking tabs first before using it. This will make it easierto bend and insert the locking tabs through the slots. When the sun’s angle is below 50°, assemble the cooker by inserting the two locking tabs through the two upper slots. When the sun’s angle is above 50°, assemble the cooker by inserting the two locking tabs through the two lower slots.
The vertical section of the cooker's panels can be tilted backward, and kept in the desired position, by wedging a small stone under the lower edge of the two vertical panels on the side. Backward tilting of the cooker will allow for better focusing of the sunlight towards the cooking pot when the sun moves to a higher altitude.
Settings and cooking
To cook, put food in a black metal pot (3 to 4 liters size), and cover the pot with a clear glass lid. Enclose the pot inside a clear oven bag, if available, and place the cooking pot on top of the cooker’s base. Set the cooker according to the instructions in the two previous paragraphs, and face the cooker directly towards the Sun to start cooking. Adjust the cooker, from time to time, to ensure that the sunlight stays focused on the cooking pot. Tilt the cooker forward, as shown in the above illustration, should there be a need to start cooking even when the sun is still low, less than 35°. It would also help if the cooking pot is raised higher by an inch or two, with a support, to better capture the low sunlight.
Storage and Transportation
The Sunny Cooker can be fully folded by first releasing the two locking tabs from their slots, and following the folding steps shown in the illustrations below. A fully folded Sunny Cooker measures about 21”x18”x3”. Some of the joints, between panels, may remain flat when a folded cooker is taken out of storage and re-assembled for use. To correct this, it is necessary to refold the cooker, along its existing fold lines, and adjust the panels until you get an even cooker curvature. I hope that the introduction of the Sunny Cooker design will be able to help bring about meaningful savings due to a reduction in the amount of construction material required.